
Designing a banner for your blog or website has never been this easy. You can now create professional banners with very impressive graphics and automatically generate the html codes which you can easily copy and paste in your website builder page for free; once published your ad banner will instantly be live in your website. To do this you need Bannersnack.
Once you have landed on the site's homepage simply follow these easy steps:
1.) Click on the 'make a banner Tab' at the centre of the page.
2.) You will then be prompted to sign in; simply sign in using either your facebook, twitter, google or e-mail
account.
3.) Next, select the banner size you wish to create; the options are listed at the top of the page. On the
same page, select one of the many banner templates which have already been pre-designed for you
whereby you will be able to customize them. The banners are very impressive and 100% customizable.
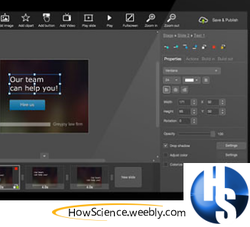
4.) After the banner creator has loaded the template, take your time to edit and customize the banner to
your own desires; the tools are easy to use and the process is very much straight foward.
5.) Once you are done customizing your banner, click on the 'save & publish' tab at the top right corner of
the page; a small pop-up window will show up prompting you to fill the name of your banner as well as
the banner Url. On the name field simply type in a name you wish to give your banner, on the Url field
type in the destination Url which you wish a user to be redirected to once the banner has been clicked
on in your live blog/ website (in most cases it will be you client's web/facebook page). Then click the
'publish' tab.
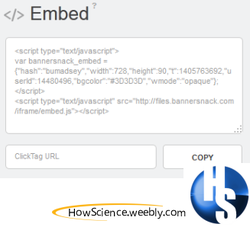
6.) Once the publishing is complete, a URL code for youR banner will be generated and shall appear on the page. Now click on the 'copy' tab below the code window; a pop-up window will then appear, simply click on the 'USE FREE(with watermark)' tab. once the pop-up window disappears, right click on the highlighted url code and click on the copy option.
7.) Next, login to your website/blog builder and paste the url code in a location you wish the advertisement banner to appear. Then publish your site/blog and you are done! Enjoy!
1.) Click on the 'make a banner Tab' at the centre of the page.
2.) You will then be prompted to sign in; simply sign in using either your facebook, twitter, google or e-mail
account.
3.) Next, select the banner size you wish to create; the options are listed at the top of the page. On the
same page, select one of the many banner templates which have already been pre-designed for you
whereby you will be able to customize them. The banners are very impressive and 100% customizable.
4.) After the banner creator has loaded the template, take your time to edit and customize the banner to
your own desires; the tools are easy to use and the process is very much straight foward.
5.) Once you are done customizing your banner, click on the 'save & publish' tab at the top right corner of
the page; a small pop-up window will show up prompting you to fill the name of your banner as well as
the banner Url. On the name field simply type in a name you wish to give your banner, on the Url field
type in the destination Url which you wish a user to be redirected to once the banner has been clicked
on in your live blog/ website (in most cases it will be you client's web/facebook page). Then click the
'publish' tab.
6.) Once the publishing is complete, a URL code for youR banner will be generated and shall appear on the page. Now click on the 'copy' tab below the code window; a pop-up window will then appear, simply click on the 'USE FREE(with watermark)' tab. once the pop-up window disappears, right click on the highlighted url code and click on the copy option.
7.) Next, login to your website/blog builder and paste the url code in a location you wish the advertisement banner to appear. Then publish your site/blog and you are done! Enjoy!
M.F.M (c) 2014
For howscience.weebly.com
[Please don't forget to like, share and join us via facebook floating widget on your right]
For howscience.weebly.com
[Please don't forget to like, share and join us via facebook floating widget on your right]
 RSS Feed
